Pixel tracking is one of the major tracking methods used by Performance Marketers while running their campaigns. This method is used while predominantly used while running Google Ads Campaigns & Facebook Ads Campaigns to record conversions for a particular campaign. While running the campaigns on these platforms, the integration with a performance-tracking solution is one of the major concerns for any Affiliate Marketer.
Now Trackier has come up with a very easy integration process for this which only requires you to follow only 2 easy steps.

But before we get into setting up the integration you need to make sure that these criteria are fulfilled.
- The Campaign Conversion tracking pixel should only be Iframe Pixel, which means you need to integrate with the Advertiser using only Iframe Pixel.
- Request for the JS script or the pixel from the publisher’s end.
After the above 2 conditions are met, then you can follow the steps below.
Step 1: Adding The Publisher Pixel
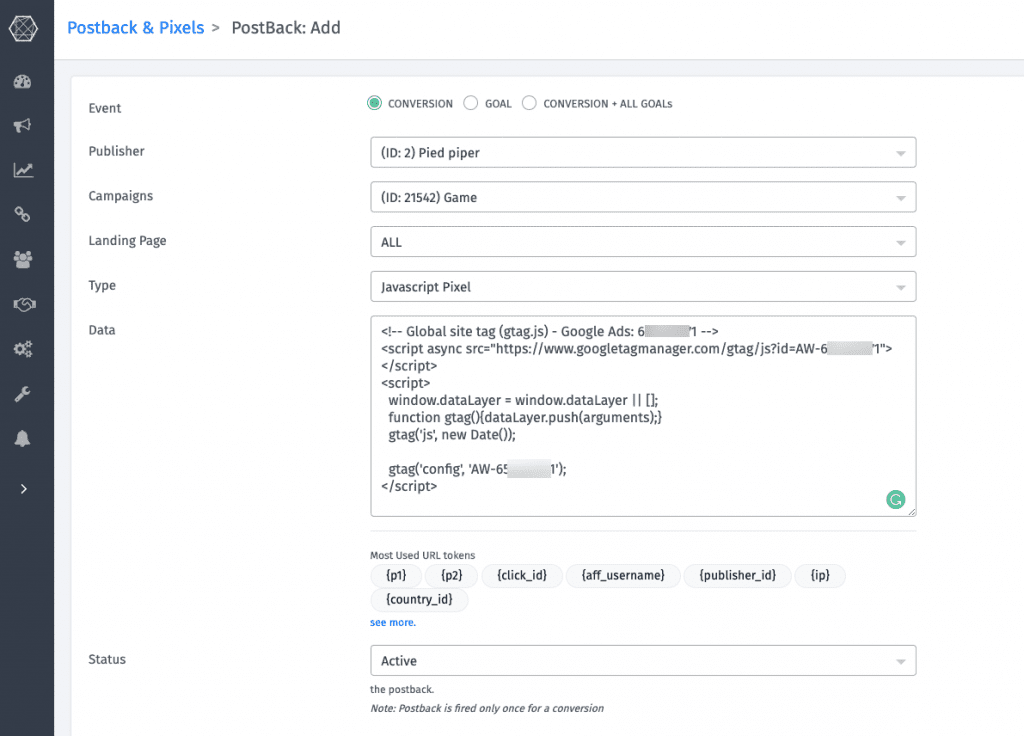
Follow this, Go to Publisher > Postback/ pixel > Action Button > Add New Postback/pixel .

- Event: You need to choose the exact event or activity on which you want to fire pixels.
- Conversion – If the event in the campaign is default then choose this one.
- Goal – If the event in the campaign is a custom goal that you have added then choose this one.
- Conversion + All Goals – This is not a valid case for Google and Facebook pixel integration.
- Publisher: Choose the Publisher for which you want to add the pixel for.
- Campaign: Choose the campaign from your list for which you want to set pixel, Pixel will always be campaign specific it can’t be global.
- Landing Page: If you have added multiple landing pages in camp, choose the specific one for which you want to add pixel or Js scrip.
- Type: Open and in the drop-down menu select Javascript Pixel.
- Data: Add or paste the pixel you got from the publisher, based on the publisher institution you can add multiple pixel-based ones after another. There is no need to add anything else to the code.
Save the pixel once you are done.
Step 2: Activating & testing the Pixel for the Publisher
To check that the pixel has been activated after being placed the Publisher needs to send live traffic from the Google or Facebook ad. Once testing is done and conversion is recorded on the publisher end you can move ahead.
You can follow the guide for testing and troubleshooting
In case you face any issues, you can check out our article or reach out to us at support@trackier.com


