
Your click-based reports are telling one story. Your actual campaign influence is telling another. A user sees your display ad on Tuesday. They do not click it. On Thursday, they come back directly, convert, and that conversion gets credited to direct traffic or whatever the last click was. The impression that drove the decision gets no credit at all.
View-Through Attribution (VTA) in Trackier is designed to close that gap. It lets you attribute conversions to users who were exposed to an ad impression but never clicked on it, giving you a more complete picture of what your campaigns are actually contributing. This guide covers what VTA is, how it differs from standard attribution, and how to configure and verify it correctly inside Trackier.
What Is View-Through Attribution?
View-Through Attribution, also known as impression tracking, is a method of attributing conversions to ad impressions rather than ad clicks. Instead of only measuring what happens after a user clicks, VTA measures whether a user saw an ad and later converted within a defined attribution window.
Here is how the two attribution types compare:
| Attribution Type | How It Works |
| Click-Based Attribution | A user clicks an ad, visits the landing page, and converts. The conversion is attributed to the click. |
| View-Through Attribution | A user sees an ad but does not click. They later visit the site and convert. The conversion is attributed to the impression. |
VTA is particularly valuable for brand awareness campaigns and display advertising, where users may be influenced by an ad without clicking on it immediately. Without it, the contribution of impression-based publishers to your overall conversions is either missed entirely or misattributed to another channel.
What Is It Used For?
Once VTA is configured on a campaign inside Trackier, it handles the following:
- Captures conversions that were influenced by ad exposure but not driven by a direct click
- Gives publishers running impression-based traffic a fair attribution model for their contributions
- Provides a more complete picture of how display and awareness campaigns contribute to overall performance
- Enables accurate measurement alongside click-based attribution within the same campaign
What You Would Require Before Starting
Before configuring VTA in Trackier, you will need a few things in place, depending on how your campaign is structured.
For MMP campaigns, ask your advertiser to share their view-through URL. This is the URL you will place in Trackier. Campaign creation proceeds as usual alongside this.
For direct advertiser campaigns, no additional URL from the advertiser is needed. You will generate an impression pixel directly from Trackier and share it with your publisher to be placed on the relevant page where the ad will be displayed.
In both cases, VTA needs to be enabled at the campaign level inside your Trackier panel before anything else.
Action 1: Enable View-Through Attribution in Campaign Settings
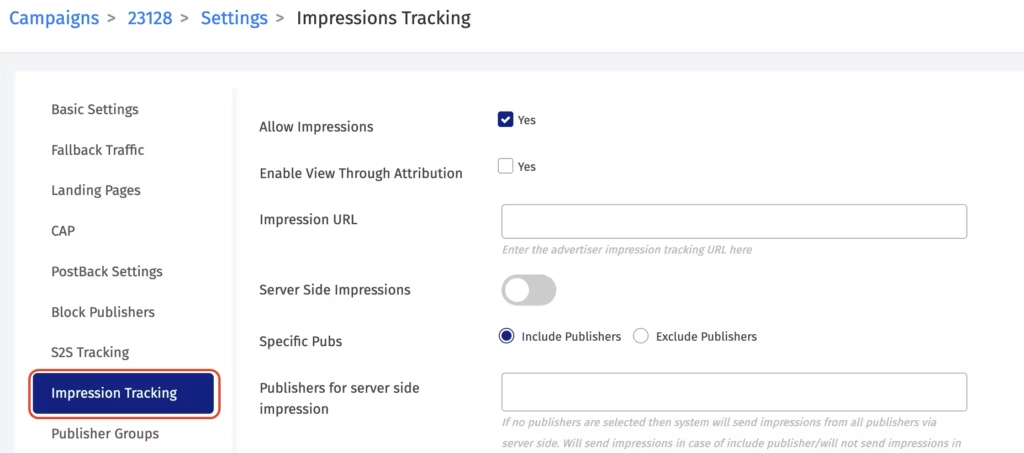
Open the relevant campaign in your Trackier panel and go to Campaign Settings, then navigate to Impression Tracking. Here you will find two toggles to activate:
- Allow Impressions: enables impression tracking on the campaign.
- View-Through Attribution: enables conversions to be attributed to impressions within your defined attribution window.
Both need to be turned on for VTA to function. From the same Impression Tracking settings page, two additional controls are available:
- Whitelist Publishers for VTA: restricts VTA attribution to specific publishers only, rather than applying it across all publishers on the campaign. Use this when only certain publishers are running impression-based traffic, and you want VTA credit applied selectively.
- Server-Side Impressions: enable this if you want to track impressions server-side rather than via pixel. You can include or exclude specific publishers from server-side impression tracking from this same setting.
Action 2: Generate and Share the Impression Pixel
Once your settings are saved, go back to the Campaign Info page and generate the Impression Pixel from the tracking link section.
Share this pixel with your publisher and ask them to place it on the page where the ad will be displayed. When a user views that page, Trackier records the impression. If that user later converts within the VTA attribution window, the conversion is attributed to the impression rather than a click.
Verifying Your Setup
- For MMP campaigns: Confirm that the GAID, IDFA, and any other required device identifiers are being passed from your publisher in the Trackier Impression URL, and that the same values are being forwarded to the MMP’s view-through attribution URL. This is essential for the MMP to match the impression to the conversion on their end. You can find all supported macros for the Impression URL in the Trackier Knowledge Base.
- For direct advertiser campaigns: No additional verification steps are needed beyond confirming the impression pixel has been placed correctly on the publisher’s page and that both toggles are enabled in campaign settings.
Where to Find VTA Data in Reports
VTA conversions appear in the Conversion Report inside your Trackier panel. To filter for view-through conversions specifically, go to the Conversion Report and search for “Is View Through Attribution” in the filter options. Apply the filter to see only conversions attributed via VTA.
This lets you measure view-through performance separately from click-based conversions, so you can evaluate the true contribution of your impression-based publishers without mixing the two attribution models.
Need Help?
If you run into any issues while enabling VTA or configuring impression tracking on your campaigns, our support team is available via the in-platform chat or at support@trackier.com. We will make sure your impression data is flowing correctly, and your publishers are getting the attribution credit they deserve.
FAQs
What is View-Through Attribution in Trackier, and how is it different from standard attribution?
View-Through Attribution lets you attribute conversions to users who saw an ad impression but did not click on it. Standard click-based attribution only credits conversions that follow a direct click.
VTA fills in the gap for display and awareness campaigns where ad exposure influences a conversion but does not drive an immediate click.
How do I enable View-Through Attribution on a campaign in Trackier?
Open the campaign in your Trackier panel, go to Campaign Settings, and navigate to Impression Tracking. Turn on both the Allow Impressions toggle and the View-Through Attribution toggle.
Once saved, you can generate an impression pixel from the Campaign Info page and share it with your publisher.
Do I need anything from my advertiser before setting up VTA?
It depends on your campaign type. For MMP campaigns, ask your advertiser to share their view-through URL, which you will place in Trackier alongside your standard campaign setup. For direct advertiser campaigns, no additional URL is needed. You generate and share the impression pixel directly from Trackier.