To track your performance with a particular advertiser you need to share your img/iframe pixel if you want to use pixel tracking as the primary method to tracking. The tracking pixel can simply be placed on the advertisers thank you page or landing page. As both the image pixel & the IFrame pixel are more or less the same, so based on the different advertiser requirements you can simply share the pixel with the advertiser. We at Trackier support both Iframe pixel tracking & Image pixel tracking.
Important To Note: The image pixel & the IFrame pixel are primarily are used when the partners are directly working with the advertisers & the advertiser is not using a tracking solution. Also, pixel tracking is not used in CPI Campaigns.
What are the different levels of pixel tracking supported by Trackier?
Trackier supports 2 levels of pixel tracking
- Campaign Level: This pixel is valid only for a particular campaign,this pixel tracking is always recommended as is gets very easy to check the Pixel log, in case of an issue.
- Advertiser Level: This is only recommended if the advertiser is not comfortable adding the pixel multiple times.
Important To Note:
- Trackier Pixel is used only for recording the conversions based on the macros that are passed by the advertiser. No other data is being tracked by the pixel.
- Our Pixel will track conversions for the traffic which will come through our Tracking domain. The pixel will not track any other traffic data which is coming from outside our Tracking domain.
How to create a campaign on image/iframe Pixel?
The conversion tracking method can be changed at any point of time Https Iframe/Image pixel.
While creating a campaign you will get an option to select pixel tracking & if the campaign is fetched by the use of API or already created then you can change the details as shown in the below image.
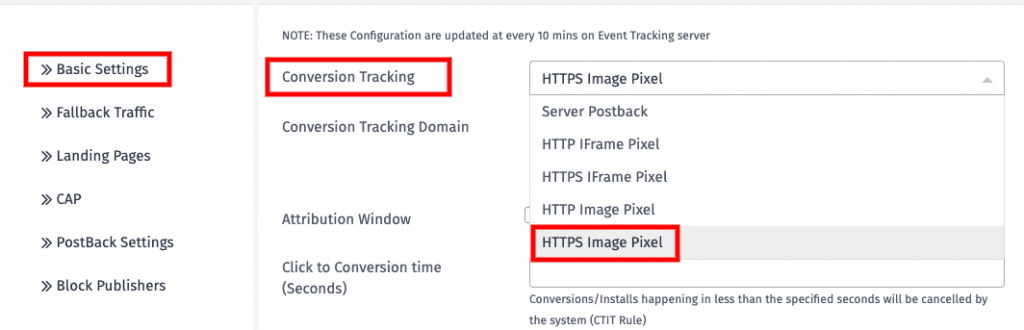
After setting the conversion method is set as IFrame/Image Pixel then you can simply follow the following steps to setup integration on the Advertiser End.
Step 1
Creating the pixel for default and goal
The default conversion can be any value you choose, it completely depends on the kind of campaign you are running. It can be Registration, Purchase, etc. Checkout the example below to learn more:
Let’s say you are running a CPS campaign. In that the default attributes to track will be
- Registration (default)
- Sale
Pixel for default conversion will be

This will be your pixel for Registration and it will be placed on Registration Thank you page.
Important To Note:
- Please select upsells box, it will add a parameter &txn_id=UNIQUE_ID
- The Advertiser will need to replace UNIQUE_ID with their macro.
- Via this we will get a Unique value Advertiser is generating when a user Register.
- This will be extremely important when you match the report at the month-end.
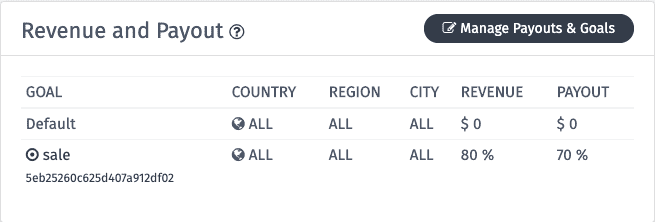
Pixel for goal conversion tracking
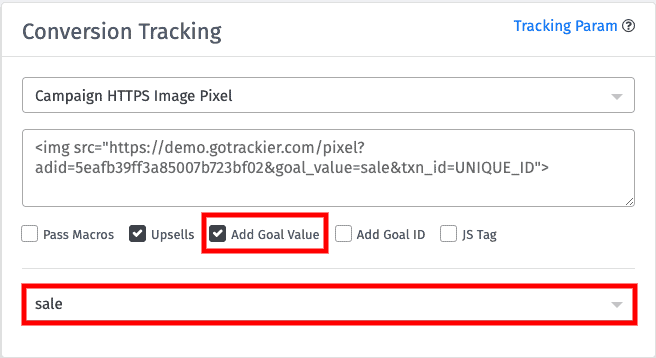
Instructions To Follow:
- Select the checkbox Goal value.
- Select the goal value, that you had created.
- once you have selected it will get implemented in postback as &goal_value=sale.
- Add parameter for &sale_amount= and ask the advertiser to pass the sale amount in this parameter.
The same way you can generate Multiple event postbacks and share with advertisers based on the conversion that you want to track.
Check the list of parameters which you can pass in the advertiser postback
- sale_amount
- revenue
- txn_id
- sub1-sub10
- status
Step 2
Adding Pixel on the Advertiser end
Here you need to share the pixel generated for default and goal with the advertiser, you need to make sure pixel is placed as intended.
- Copy the code as it is and ask the advertiser to add it without any alteration.
- It should be placed inside <body> tag
- Pixel should be placed on Thank you page.
- Thank you page would be the page that appears when the user entered the details and click submit button
- Make sure Advertiser has added txn_id={ADVERTISER_MACRO} and replaced “{ADVERTISER_MACRO}” with their macro.
Step 3
Run a Test Conversion
- After the advertiser adds your pixel on their page, you can run a test conversion.
- Generate a tracking URL for the demo publisher.
- Make sure the domain for tracking link and pixel domain is the same.
- Open the Incognito mode of browser.
- Make a test Conversion.
- Check Pixel Logs and Conversion Log for the conversion.
- If you are to record a conversion then it is a success, if not you can review Article Pixel Troubleshooting
In case of any doubt, you can checkout our article on the helpdesk or connect with us at support@trackier.com.