Whether you’re onboarding a new advertiser, launching an affiliate offer, or scaling your performance marketing network, every campaign needs accurate tracking from day one. Trackier’s campaign wizard simplifies the entire process with a guided setup that helps you configure campaign details, payouts, tracking, targeting, and publisher settings in one streamlined workflow.
This guide explains how the Campaign Wizard works, what each step includes, and how to launch campaigns confidently with minimal manual effort.
What Is the Campaign Wizard?
The campaign wizard is Trackier’s guided campaign creation tool that walks you through every major campaign configuration step. Instead of manually navigating multiple sections after creating a campaign, you complete everything through a structured workflow before launching.
Whether you’re creating your first offer or your thousandth, the wizard ensures every essential setting is configured correctly.
Why Use the Campaign Wizard?
Setting up campaigns manually can be time-consuming and prone to configuration mistakes. Campaign wizard streamlines the entire process with a guided, step-by-step workflow, helping you create campaigns quickly while ensuring every essential setting is configured correctly.
- Create campaigns faster with a guided workflow
- Configure tracking and payouts in one place
- Reduce setup errors by following structured steps
- Launch campaigns with all required settings completed
- Improve consistency across advertiser campaigns
- Save time for campaign managers and operations teams
Before You Create a Campaign
Before launching a campaign, make sure you have:
- Added your advertiser to the Trackier panel
- Configured the advertiser postback if required
- Added publishers who will promote the campaign
- Prepared landing page URLs and payout information
Having these details ready makes campaign creation much faster.
How to Create a Campaign through Campaign Wizard
Navigate to Campaigns and click Create Campaign to launch the Campaign Wizard. This opens a structured, step by step setup flow instead of dropping you into a blank campaign page with dozens of scattered settings to hunt down.
The wizard guides you through each configuration step in order, from basic campaign details to tracking, payouts, targeting, and publisher settings, so nothing critical gets skipped. You can move forward at your own pace, and your progress is saved as you go, meaning you don’t have to complete every step in a single sitting. If you need to step away mid-setup, you can pick up right where you left off.
Step 1: Basic Campaign Information
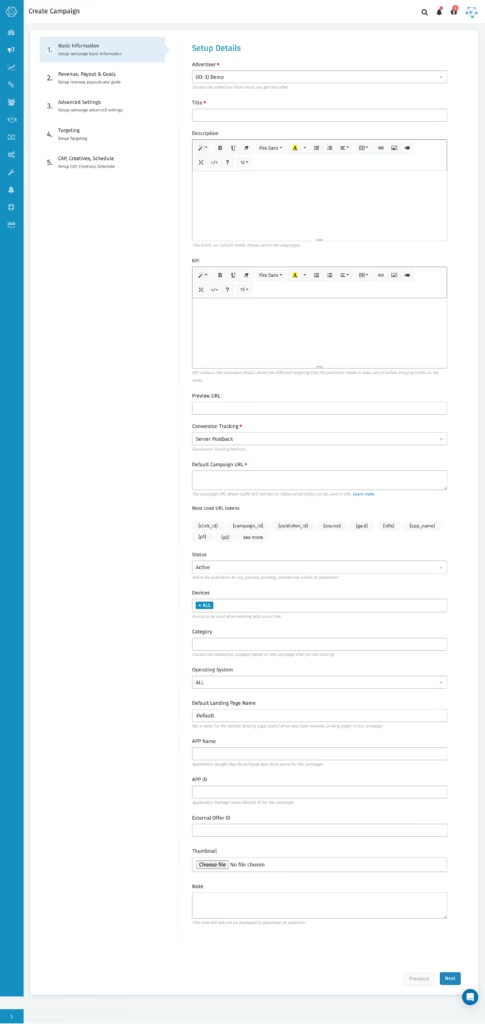
Start by entering the campaign’s core details. Typical information includes:
- Campaign name
- Advertiser
- Campaign status
- Campaign category
- Campaign description
- Internal notes (if required)
These details help organize campaigns and make them easier to manage later.
Step 2: Configure Tracking
Next, configure how Trackier should track incoming traffic and conversions. Depending on your campaign type, you can configure:
- Tracking URL
- Conversion tracking
- Attribution settings
- Postback configuration
- Tracking domains
Accurate tracking is the foundation of reliable reporting.
Step 3: Define Payouts & Revenue
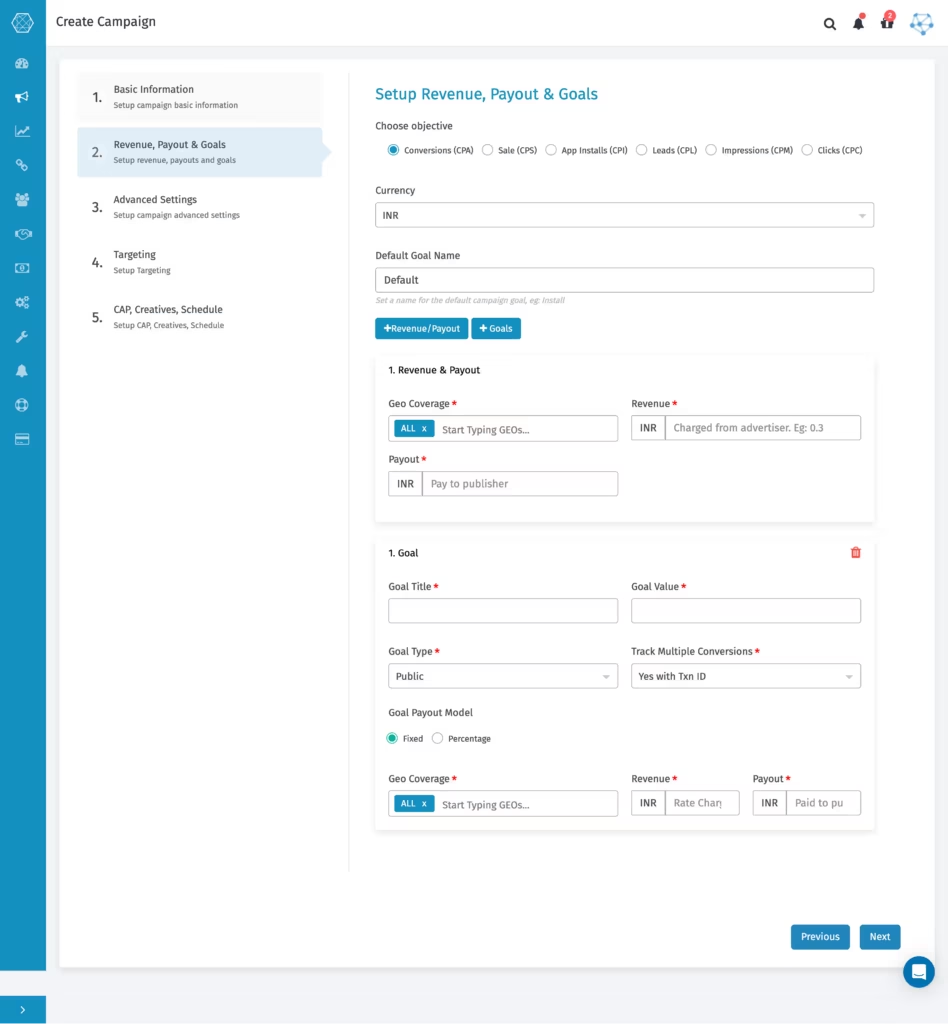
Configure how publishers are rewarded and how campaign revenue is calculated. You can define:
- Publisher payout
- Advertiser revenue
- Conversion goals
- Commission models
- Currency
Setting these correctly ensures accurate reporting and partner payments.
Step 4: Add Landing Pages
Every campaign needs at least one destination. The campaign wizard lets you:
- Add one or multiple landing pages
- Assign landing page priorities
- Configure redirects
- Prepare campaigns for A/B testing if required
Multiple landing pages provide greater flexibility for campaign optimisation.
Step 5: Configure Targeting
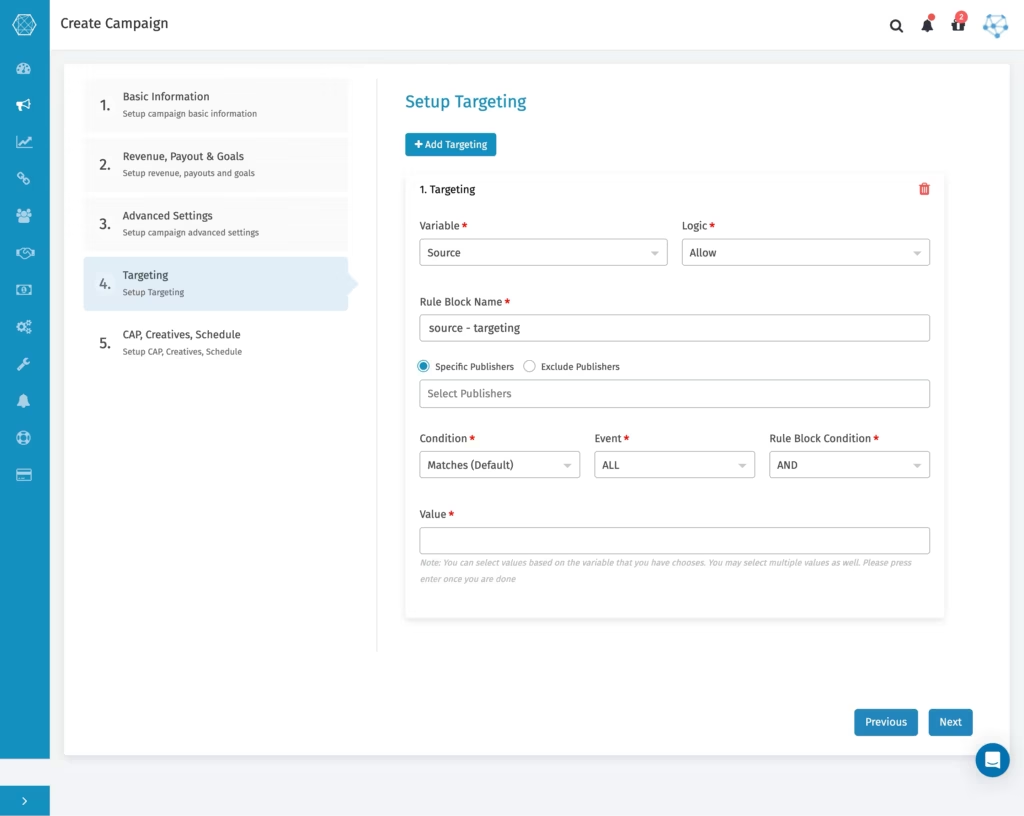
Choose who should receive your campaign traffic. You can configure targeting based on:
- Country
- Device
- Browser
- Operating System
- City
- ISP
- Custom targeting rules
Proper targeting ensures advertisers receive qualified traffic while publishers promote offers to the right audience.
Step 6: Configure Publisher Settings
Decide how publishers interact with the campaign. Depending on your requirements, you can configure:
- Publisher visibility
- Publisher-specific payouts
- Approval requirements
- Allowed traffic channels
- Publisher targeting
These settings help you maintain quality while giving publishers the right level of campaign access.
Step 7: Review Campaign Settings
Before publishing, review every configuration carefully.
Verify:
- Tracking links
- Landing pages
- Payouts
- Revenue settings
- Goals
- Targeting rules
- Publisher access
A quick review helps prevent tracking or payout issues after launch.
Launch Your Campaign through Campaign Wizard
Once everything is configured, save the campaign. Trackier immediately generates the campaign tracking links, allowing publishers to begin sending traffic as soon as they’re approved.
From there, you can monitor clicks, conversions, revenue, and campaign performance in real time.
Best Practices
To get the most out of the campaign wizard:
- Complete advertiser setup before campaign creation
- Verify landing page URLs before publishing
- Double-check payout and revenue values
- Apply targeting rules where required
- Add approved traffic channels for publisher guidance
- Test tracking links before sharing them with partners
Common Mistakes to Avoid
Watch out for these common setup issues:
- Launching without configuring conversion tracking
- Incorrect payout or revenue values
- Missing landing pages
- Incomplete targeting rules
- Forgetting publisher permissions
- Skipping campaign testing before launch
A few minutes of verification can save hours of troubleshooting later.
Need Help?
If you need assistance creating campaigns, configuring tracking, setting payouts, or understanding any step in the campaign wizard, our support team is available through the in-platform chat or at support@trackier.com.
We’ll help you launch campaigns faster, configure every setting correctly, and ensure your tracking is ready before the first click arrives.
FAQs
What is the Campaign Wizard in Trackier?
The Campaign Wizard is Trackier’s guided campaign creation tool that walks you through every major setup step, from basic details to tracking, payouts, targeting, and publisher settings, all in one structured workflow.
How do I create a campaign using the Campaign Wizard?
Navigate to Campaigns and click Create Campaign to launch the Campaign Wizard. It guides you through seven steps: basic information, tracking configuration, payouts and revenue, landing pages, targeting, publisher settings, and a final review before you go live.
What do I need before starting the Campaign Wizard?
Before launching a campaign, add your advertiser to the Trackier panel, configure the advertiser postback if required, add publishers who will promote the campaign, and prepare your landing page URLs and payout details. Having these ready speeds up the Campaign Wizard process significantly.
Can I add multiple landing pages in the Campaign Wizard?
Yes. The Campaign Wizard lets you add one or multiple landing pages, assign priorities, configure redirects, and set up A/B testing if needed.
