You have an offer from an advertiser. You have publishers ready to run traffic. What you need now is a campaign, the structure that connects all of it and makes sure every click, conversion, and payout is tracked correctly.
In Trackier, campaign setup is not just about filling out a form. It is about making the right choices at each step so that your tracking holds up, your payouts go to the right people, and your reporting tells you something useful.
This article walks through every section of the campaign setup flow.
What You Need Before You Do A Campaign Setup
A few things need to be in place before you create a campaign.
Make sure the advertiser and publisher have already been added to your Trackier panel. You will also need the advertiser’s tracking URL, their Click ID parameter, and clarity on the revenue and payout structure. If the campaign is impression-based, have the impression URL ready. If you are using geo-targeting, know which regions you want to include.
Going in with this information means fewer interruptions during setup.
The Foundation: Building Out Your Campaign’s Core
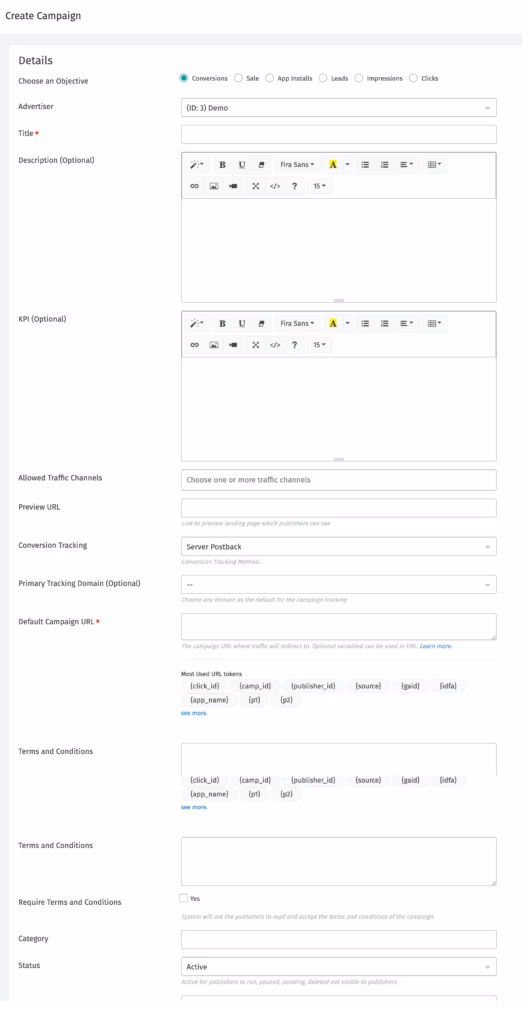
This is where the campaign setup takes place. You will find the Create Campaign option under the Campaigns section in the left panel.
Campaign URL – is where all traffic redirects. This is the advertiser’s destination URL, and it needs to include Trackier’s macros for the Click ID to be passed correctly.
Click ID Parameter – is what connects a publisher’s click to a conversion. The advertiser uses a specific parameter name to receive the click ID, and you will map Trackier’s click ID macro against it here. Getting this wrong means conversions will not be attributed back to the right source.
Objective – defines what you are tracking and how publishers get paid.
- Conversions cover leads, acquisitions, and actions. Publishers are paid on CPA.
- The sale is for e-commerce or revenue-share setups. Publishers are paid on CPS.
- Leads tracks lead generation. Publishers are paid on CPL.
- Impressions tracks banner views. Publishers are paid on CPM. For this objective, the impression URL must include the imp=true parameter.
- Clicks are for cost-per-volume campaigns.
Advertiser – connects the campaign to the right entity in your panel.
Title – should be clear and consistent with your naming conventions. It is how you and your publishers will identify the campaign.
KPI – is optional, but worth using. Anything you add here, traffic quality requirements, restricted regions, compliance notes, is visible to publishers on their side of the panel.
Preview URL – is the public-facing link for the offer. For app campaigns, this would typically point to the App Store or Play Store listing.
Conversion Tracking – determines how conversions get reported back to Trackier.
- Server Postback (S2S) is the most reliable method. The advertiser’s server fires a postback to Trackier using the correct macros and parameters.
- Image Pixel places a pixel on the thank-you page. When the page loads after a conversion, the pixel fires.
- iFrame Pixel works similarly, firing on the confirmation page when reached.
Primary Tracking Domain is the domain that will appear in the tracking links generated for publishers.
Campaign Setup: What You Earn and What You Pay Out
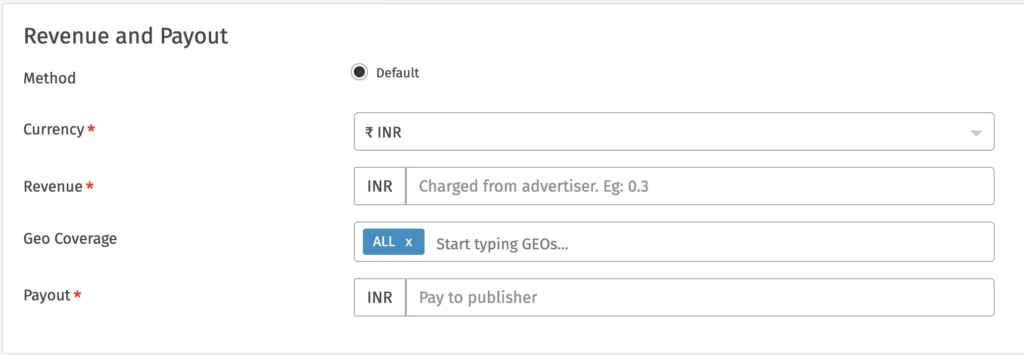
Currency – should match the geo or the terms agreed with the advertiser.
Revenue – is the amount the advertiser pays you per conversion.
Payout – is what you pay the publisher per conversion.
Geo Coverage – controls which regions count. Only conversions from the listed GEOs will receive a payout. Conversions from outside those regions are recorded but receive zero payout. This is sometimes referred to as soft targeting.
Fine-Tuning Visibility, Redirects, and Traffic Controls
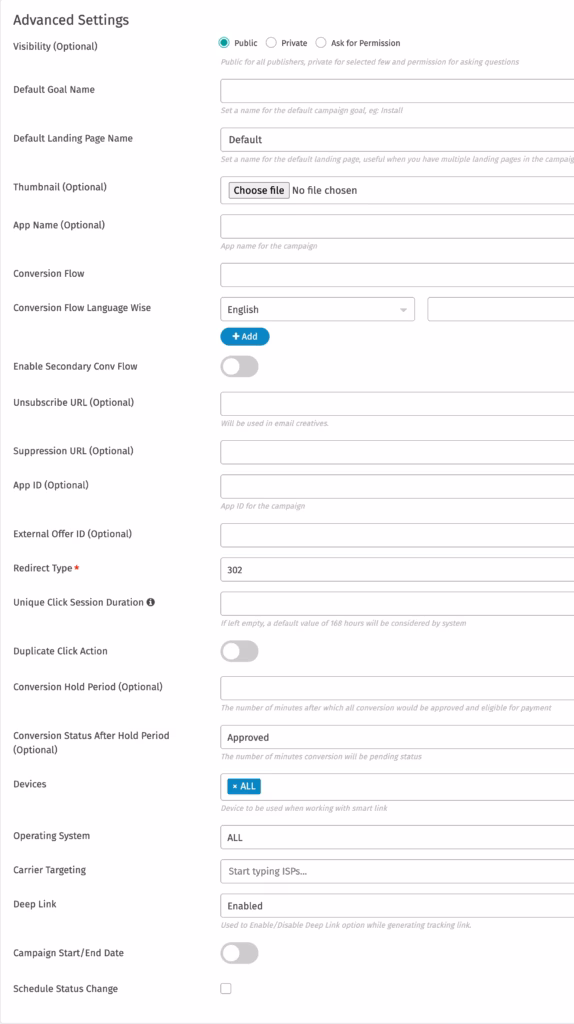
1. Visibility controls whether publishers can see and access the campaign.
- Public makes the campaign visible to all publishers, who can start running it immediately.
- Ask for Permission shows the campaign but requires publishers to request access before they can get a tracking link.
- Private keeps the campaign hidden from all publishers until you explicitly approve them.
2. Redirect Type determines how the tracking link behaves.
- 302 Redirect is the default. It sends users to the campaign URL as expected.
- 302 with Hidden Referrer does the same, but masks the referring source. Note that this does not work on iOS devices.
- 200 Redirect is used primarily for Facebook Ads, where the tracking domain acts as the referrer.
- 200 with Hidden Referrer works across devices, including iOS.
3. Unique Click Session Duration – sets the window for counting unique clicks. The default is 168 hours if left blank.
4. Duplicate Click Action – lets you route duplicate clicks to a blank page or a fallback URL.
5. Conversion Hold Period – is useful when you need to validate conversions before approving them. Set the duration, and choose whether conversions move to approved or extended status after the hold.
6. Device and OS Targeting – lets you restrict the campaign to specific hardware and operating systems.
7. Carrier Targeting – can restrict or allow traffic from specific ISPs. Leave blank to allow all.
8. Deep Link – can be enabled if the campaign supports direct app-level linking.
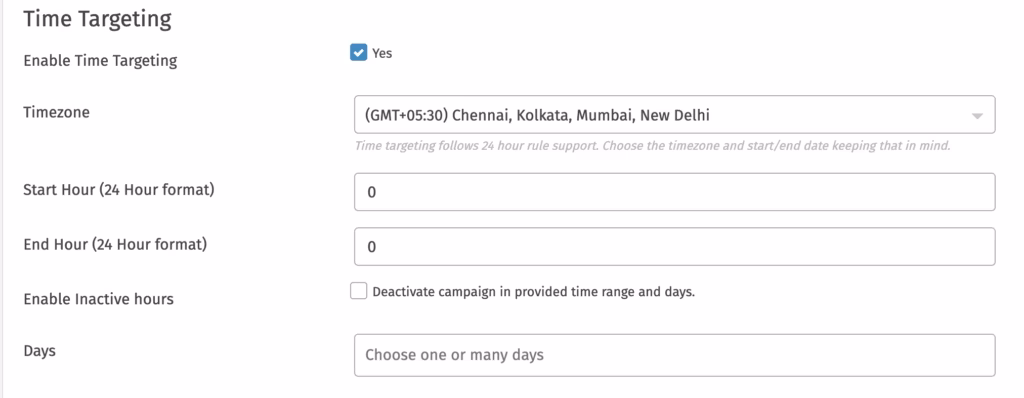
Controlling When Your Campaign Runs
1. Campaign Start and End Date – set the overall window for the campaign.
2. Schedule Status Change – lets you automate a status switch, useful for planned pauses or activations.
3. Publisher Email Notification – can be scheduled to alert publishers ahead of any status change.
4. Time Targeting – runs the campaign only during specific hours and days. Set the timezone, active hours, and days of the week. If you want to define inactive windows rather than active ones, enable the Inactive Hours option.
One important note on end time: Trackier treats end time as the end of that hour. If you want the campaign to stop at 07:00, set the end time to 06:00, which will deactivate it at 06:59. There is also a 5 to 10 minute activation and deactivation delay built into scheduling.
Going Live: Final Checks Before You Launch
Once all sections are complete, click Create. If any required field is missing, Trackier will flag it before the campaign goes live.
After creation, it is good practice to test the tracking link before sharing it with publishers, verify the postback setup with the advertiser, and check that the Click ID macro is passing correctly. For CPM campaigns, confirm the impression URL setup is firing as expected.
Monitor the Conversion Report after launch to confirm that attributions are recording accurately.
Need Help?
If you run into any issues while campaign setup or configuring tracking, payouts, or targeting, Trackier’s support team is available via the in-platform chat or at support@trackier.com. We will make sure your campaigns are set up correctly from the start, so every click is tracked, and every conversion is attributed where it belongs.
What is the difference between revenue and payout in Trackier?
In Trackier’s Campaign Setup, revenue is what you receive from the advertiser per conversion. Payout is what you pass on to the publisher. The difference between the two is your margin on each conversion.
What happens to conversions from GEOs not listed in Geo Coverage?
During Campaign Setup, GEOs not listed are still recorded in your reporting, but no payout is assigned to them. This is called soft targeting. It allows you to see all traffic while only rewarding conversions from the regions that matter for the campaign.
Can I change campaign visibility after it has been created?
Yes. Even after Campaign Setup is complete, visibility settings can be updated at any time from the campaign’s advanced settings. Changing from Public to Private or asking for Permission will affect which publishers can see and access the campaign going forward.
What should I do if conversions are not recording after setup?
If conversions are not recording after Campaign Setup, start by checking the postback setup under Advertiser > Postback Hit Received. Verify that the Click ID macro is correctly placed in the campaign URL and that the advertiser’s system is firing the postback with the right parameters. For pixel-based campaigns, check the pixel logs from within the campaign or advertiser section.
