Are you measuring campaign performance only through clicks and conversions? You could be missing an important part of the picture: how often your ads are displayed and whether those impressions contribute to conversions.
Impression Tracking helps marketers measure ad visibility, understand publisher performance, and evaluate the role of ad exposure in campaign results. With Trackier, you can enable impression tracking, share impression data with advertisers, and configure view-through attribution to gain better insights into campaign performance.
In this guide, we’ll explain how Impression Tracking works and how to set it up in Trackier.
What Is Impression Tracking?
An impression is recorded when an advertisement is displayed to a user. For example, if a banner ad appears 1,000 times, it can generate 1,000 impressions, even if nobody clicks on it.
Impressions help marketers understand how frequently their ads are being displayed across websites, apps, and publisher placements.
While clicks show user interaction, impressions provide insight into ad exposure. When analyzed alongside clicks, conversions, and campaign costs, this data can help marketers make more informed decisions.
Why Is Impression Tracking Important?
Impression Tracking offers several benefits for advertisers, affiliate networks, and performance marketers.
- Measure ad visibility: Understand how often your advertisements are displayed.
- Evaluate publisher performance: Compare impression volumes across publishers and placements.
- Analyze campaign engagement: Compare impressions with clicks to calculate click-through rates (CTR).
- Understand conversion paths: Use view-through attribution to identify eligible conversions that occur after an ad impression without a click.
- Optimize campaign performance: Combine impression data with conversion metrics to make better campaign decisions.
Trackier lets you configure impression tracking at the campaign level and share the relevant tracking information with advertisers and publishers.
How to Enable Impression Tracking in Trackier
Follow these steps to configure Impression Tracking for your campaign.
Step 1: Open Campaign Settings
Log in to your Trackier account and navigate to the campaign you want to configure.
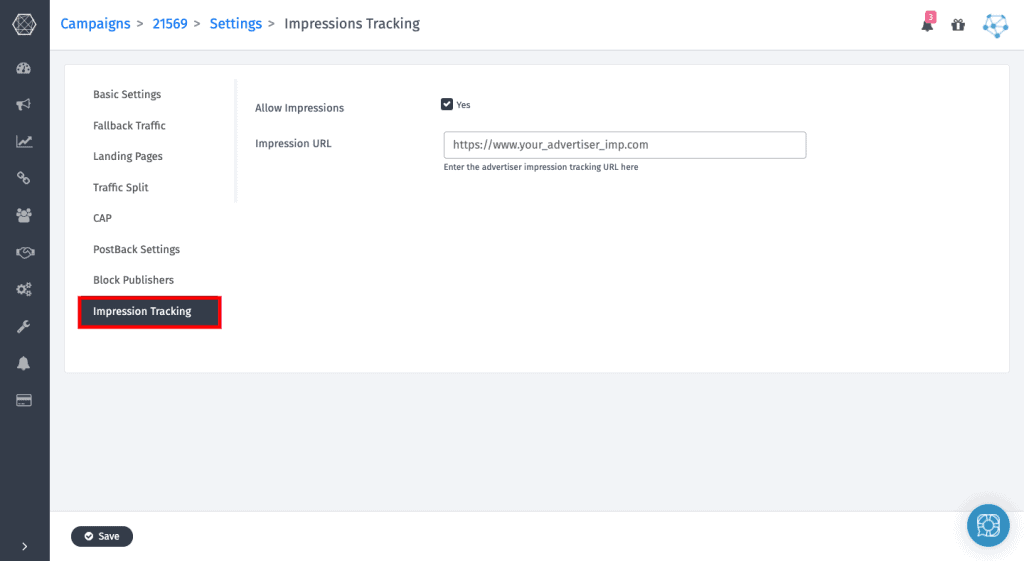
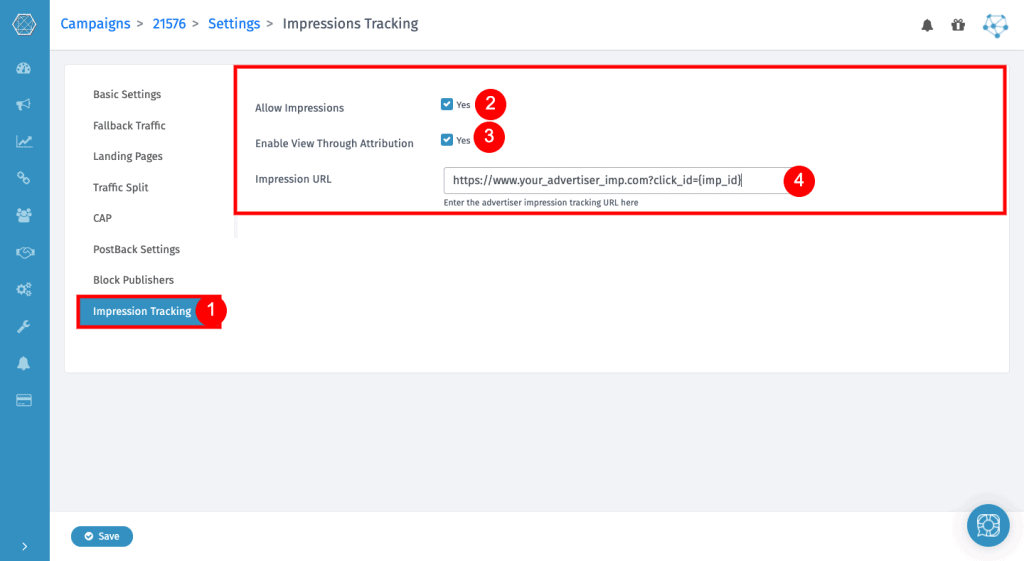
Go to Campaign > Settings > Impression Tracking to access the impression tracking options.
Step 2: Enable Impressions and Add the Advertiser URL
On the Impression Tracking settings page, enable the Allow Impressions option.
Next, enter the advertiser’s impression tracking URL in the designated field. Make sure you use the correct URL provided by the advertiser and include the required parameters and macros.
You can refer to the Trackier Impression Tracking Help Center for further guidance on supported macros and configuration.
Once you’ve entered the details, save your campaign settings.
How to Create an Impression Pixel for a Publisher
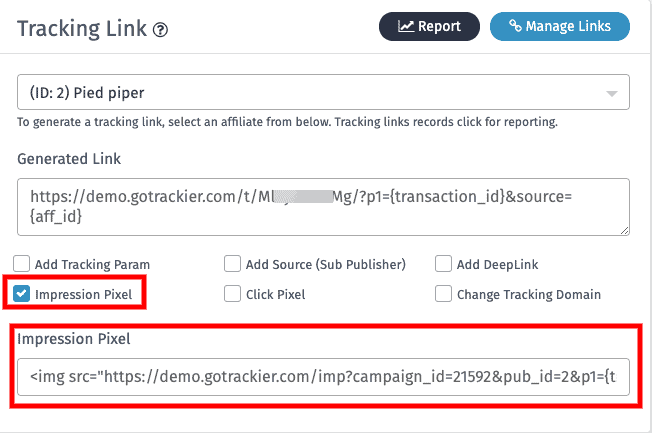
After enabling Impression Tracking, you can generate an impression pixel to share with the publisher responsible for displaying your advertisement.
Follow these steps:
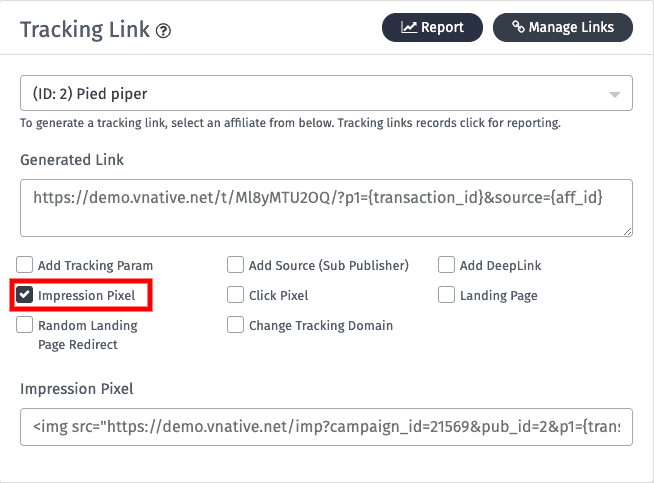
- Open the campaign’s tracking link or publisher tracking interface.
- Select the relevant publisher.
- Enable the Impression Pixel checkbox.
- Generate the impression pixel.
- Share the generated pixel with the publisher and ask them to place it on the appropriate page or ad placement.
Once implemented correctly, the pixel can help record impressions and pass the relevant tracking information to Trackier.
Note: The publisher must implement the pixel correctly for impression data to be recorded.
How to Access Impression Reports
Tracking impressions is only useful when you can review the resulting data.
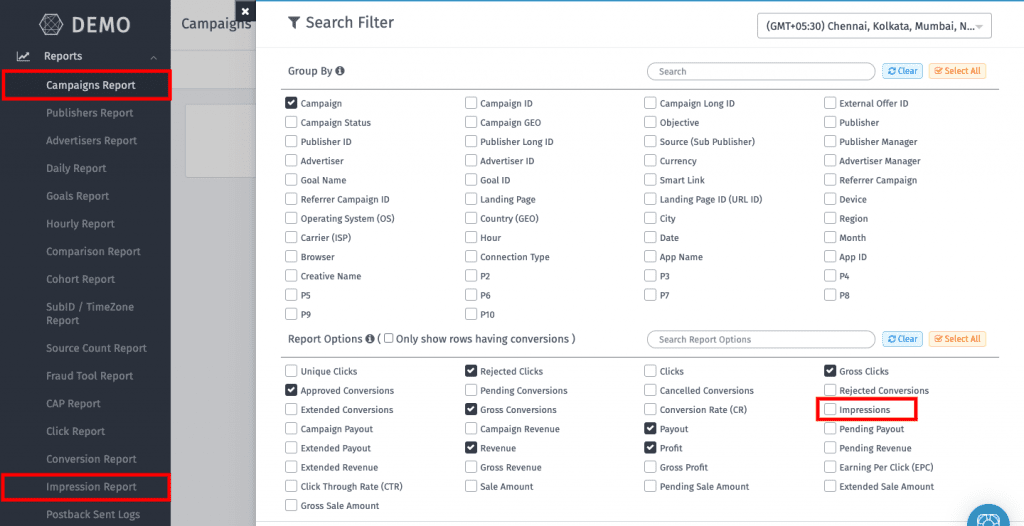
Trackier provides impression reporting to help you monitor recorded impressions and analyze campaign activity.
To review your data, open the relevant campaign reports and navigate to the available Impression Report. Use the reporting options available in your account to review performance and investigate unexpected changes in impression volume.
When analyzing results, compare impressions with clicks, conversions, and other relevant campaign metrics. A high impression count alone does not necessarily mean a campaign is generating valuable traffic.
What Is View-Through Attribution?
View-Through Attribution (VTA) helps marketers understand whether an ad impression contributed to a later conversion, even when the user did not click the advertisement.
For example, a user sees a display advertisement but doesn’t interact with it. A few days later, they visit the advertiser’s website directly and complete a purchase.
If the conversion meets the configured attribution rules and falls within the applicable attribution window, it may be attributed to the earlier impression.
This gives marketers a broader view of campaign performance beyond click-based attribution.
How to Enable View-Through Attribution in Trackier
Step 1: Enable View-Through Attribution
Open the relevant campaign and navigate to Settings > Impression Tracking.
Enable both Allow Impressions and View Through Attribution. Add the appropriate impression or view-through attribution URL provided by your advertiser or mobile measurement partner (MMP).
Make sure the URL includes the required parameters and passes the {imp_id} macro in the expected click ID parameter where required by the integration.
Save the settings after verifying the configuration.
Step 2: Generate and Share the Impression Pixel
Navigate to the campaign information page and generate the impression pixel. Share it with the publisher so they can implement it in the required placement.
For accurate tracking, confirm that the publisher has implemented the pixel correctly and that the advertiser or MMP is configured to process the required impression information.
Setting Up Impression Tracking With an MMP or Advertiser
The setup may differ depending on how your campaign is integrated.
With an MMP partner: Obtain the required device identifiers and other parameters from the publisher or integration documentation. Map these details correctly between the Trackier Impression URL and the MMP’s view-through attribution URL.
With an advertiser: Confirm whether the integration uses an image pixel, iframe, or another supported tracking method. Share the correct impression URL or pixel with the publisher and verify that view-through attribution is enabled where required.
Always confirm the required parameters with your integration partner before launching the campaign.
How to Check View-Through Conversions
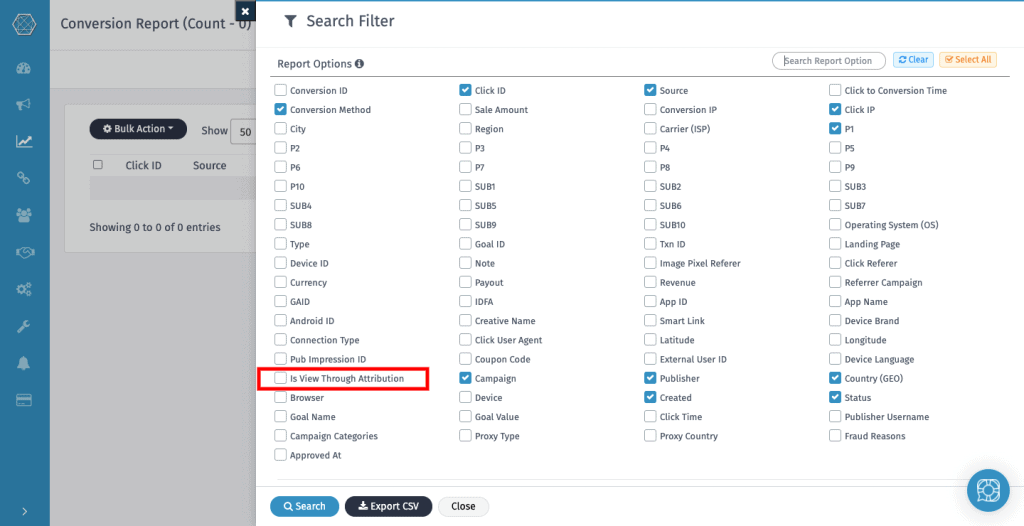
Once the setup is complete, you can review conversion data to understand which conversions were attributed through view-through tracking.
Open the Conversion Report and use the available report filters to identify conversions marked as view-through attribution.
Review these conversions alongside click-attributed conversions to understand the different ways users interact with your campaigns.
Best Practices for Effective Impression Tracking
To get the most out of Impression Tracking, follow these practices:
- Verify your setup: Test the impression URL, pixel implementation, and required macros before launching.
- Monitor impression volumes: Investigate sudden changes that could indicate delivery or tracking issues.
- Review multiple metrics: Compare impressions with clicks, CTR, conversions, and campaign costs.
- Check attribution settings: Confirm the attribution window and integration requirements with your partner.
- Monitor your plan limits: Trackier plans may include impression quotas, and additional usage may incur overage charges. Check your plan terms for applicable limits and fees.
Conclusion
Impression Tracking helps marketers understand campaign visibility and evaluate what happens before a user clicks or converts. When combined with accurate reporting and view-through attribution, it provides a more complete picture of advertising performance.
With Trackier, you can configure impression tracking, generate publisher impression pixels, review reports, and set up view-through attribution for supported integrations.
