It is no secret that some Affiliate Marketing Campaigns perform completely differently in different demographics or Geos. This is primarily due to the different nature of different audiences divided on the basis of various factors.
Due to this nature of the market, performance marketers tend to set up different targeting rules for their different affiliate marketing campaigns. This in turn helps them run their campaigns on a higher conversion rate, helping them generate more revenue as they were able to target the right customer with this feature.

In Trackier, you can easily set up campaign targeting. With our advanced targeting feature, you can create highly specific rules for targeting a campaign to your preferred audiences. In Trackier, you’ll find common targeting rules, such as device brand, browser type, and operating system. Additionally, you have the option to define and manage your own targeting rules.
To set up a targeting rule for a campaign, open Particular Campaign > Targeting.

Variables You Can Set Targeting On
| Variables | Variables |
| Source | Operating System |
| Referrer | ISP |
| Creative Name | Click IP |
| GAID | Sale Amount |
| Conversion IP | Device |
| IDFA | City |
| App Name | Sub1-Sub10 |
| Proxy Type | Country |
| Android ID |
Setting Up The Targeting Rule
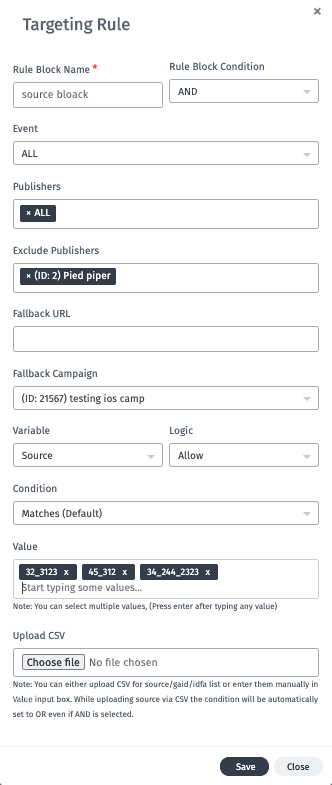
You can create a targeting rule first on the variable and further create a combination.
- Rule Block name: You can name your rule via this feature so that you can easily identify the rule if you have created multiple rules for a campaign.
- Rule Condition Block: You can select between AND / OR.
- AND- When you are adding 2 conditions in the rule and both need to be TRUE to pass Traffic.
- OR – When out of 2 conditions in the rule & Any one of them should be True to pass traffic.
- Event: You can Set the Targeting rule for any event, it can be on.
- ALL
- Click Only
- Conversion + Goal
- Conversion Only
- Goal Only
- Any Particular Goal in Campaign
- Publishers: Choose the Publisher on which rule needs to be implemented.
- Exclude Publisher: When you want to exclude certain publishers from the targeting Rule.
- Fallback URL: In case the particular targeting fails where should traffic redirect to, you can set custom URL in this section.
- Fallback Campaign: You can choose the campaign on which you want to redirect the traffic.
- Variable: Variable on which you can set targeting on, above you got all the list which you can use in this section to create a required targeting RULE.
- Logic: You can choose between Deny and Allow.
- Deny: Via this all the traffic which matches conditions and the value you enter below will be blocked
- Allow: This will Allow all the traffic which matches conditions and the value you enter below.
- Value: You need to enter the value that you need to Deny/ Allow.
Condition
- This the most important part of the targeting. For any Variable which is defined globally as the country, city, etc use Default for any other like source, GAID, IDFA use condition mentioned below which suits your condition.Matches (default): For Country, State, City, Browser, Device.
- Exact Match: if you have the exact value, eg if you know exact source value 43_343, 1223_312312_12312.
- Ends with: If your value ends with a certain fixed value. eg: _2323, _23231212
- Empty: If Value is Empty in the variable: eg: if GAID is mandatory and it is not passed by the publisher
- Bigger Than: Used with Sale Amount Variable, so that you can allow conversion which has a sale amount bigger than a defined value.
- Lesser Than: Used with Sale Amount Variable, so that you can deny conversion which has a sale amount lesser than a defined value.
Important to note:
- You can also upload a CSV for bulk allow/ Deny Source, GAID, IDFA.
- You can add multiple rules via the Add new Rule Block.
Source And Country Targeting Example
Here we will be creating a certain rule to allow traffic from certain sources And Deny Traffic from Certain Geo.

Via this rule, you will only allow traffic if it matches both conditions from Source And Country.
SOURCE will be ALLOW which MATCHES, Value 32_3123, 45_312, 34_244_2323
&
COUNTRY will be DENY which MATCHES AU, JP

In case of any related to the targeting rule available in our panel checkout our helpdesk article or reach out to us at support@trackier.com.


